Monday, January 30, 2012

Fast and Easy Curtain Fun

Well, here's that kitchen curtain I told you about.  I'll admit I had it so easy this time around because I got the 1 yard remnant piece of red broadcloth for a dollar and when I went digging around for some white cotton to do the ties with, I found some 2 1/2" strips of white cotton left over from a quilt I made for my sister a little over a year ago.  That was a great find because it was free and it was already cut - no money and less work?  I like that!
To make the curtain, I first held the piece of broadcloth up to my window.  The fabric is 45" wide annd I got a one yard piece, 36".  I decided to hang it short, since 36" is long enough (especially with the added length of the ties) for the window, and I wanted the fabric to have some body and some full gathers between the top ties.  I then took it to my ironing board and ironed down about a half inch fold on the bottom then folded that in again, ironed and pinned and then stitched the hem.  I used white thread, and it turned out pretty cute against the darker red.
Step 2 was the side hems.  The side hems I only folded down once.  I didn't need to fold it down twice because these were the selvedge ("self-finished" edges) of the fabric.  Here's a picture of the two long edges after I stitched them.  On the left, I folded down the corner because it was a little long.  Sometimes when you iron fabric, especially if you're like me and don't measure or straighten up your edges, it will give and pull a little bit and you can snip the edge or turn it under like I did here, I hope you can see the picture okay.
For the ties I broke a few more rules (:  I ironed the strips and cut them down to 18" (roughly, I only measured one and then used it as a base to cut the rest - I want them to be loosey goosey!) ...then I folded and ironed them in half.  Normally for ties like this I would sew them down the raw edges and then fold them inside out....not this time.  I sewed the raw edges and then did a tight zig-zag stitch down the seam.  I really really really hate turning things inside out - especially tight little tubes like these.  If you get a drawstring tool it has a handle and a long metal piece with a hook on it and is supposed to make things like that really easy.  I was thinking today (and I didn't get to try this out because I don't crochet) that a long crochet hook might work well for this.  Okay the final step for the ties was to fold down a corner on the end of the tie that would be exposed and stitch it to give the ties a more finished look (see it below), like you would see a ribbon tail done.
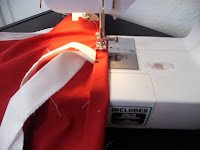
Last step of all was to attach the ties to the top and hem it.  I folded down the top like I had done before on the bottom hem, about a half inch, ironed it and then folded it down over two of the ties, like shown in the picture on the right.  After I finished the top hem I folded the ties up onto the hem itself and stitched them down again so they would pull up on the fabric flat and it wouldn't buckle.  I think it turned out pretty cute and it probably cost me less than 3 bucks and under an hour of my time doing something I love.
Last minute thoughts... If you don't want to mess with fabric ties, grosgrain (pronounced grow-grain) ribbon is an easy and inexpensive alternative.  You can also save some time and thread by sewing long strips of fabric and then cutting them as opposed to cutting and then sewing.  Also, you could make double the length strips (36") for the ties and fold them under the hem to make two 18" halves instead of using two separate ties.  This would work best with ribbon, which is not near as bulky as fabric.  Folding the fabric under the hem would create a bit of a bulge and I'm not a fan of bulge.
I guess that's all for now, hope this was clear and somthing you can use in your house, happy sewing!

Tuesday, January 24, 2012

Again with the Orange and Gray

 
I finished the orange and gray quilt top!  As you can see, it shrunk up a little.  If you're comparing photos, yes, I changed the rows around.  About 500 times.  Every once in a while I got to one that just didn't fit so I just picked one I liked better and...shocker:  it's not perfect.  I see several "problem areas" but I think I'll get it resolved.  I did it five rows at a time and it took me a week!  Life has been a little busy lately; trying to move and find a job, etc.  Anyway, overall, it's done and I'm really happy with the way it turned out.  However, I still want it to be bigger and now I think I know what I'll do.  It will probably be a while before I get the fabric to set this together, but what I hope to do is cut the top I've made into 6"-9" squares and cut the rest of the leftover fabric into like squares and then set them all together with black, kind of a windwo pane effect.  I think it will look super cute and the black will set off the bright colors in the quilt.
For my next project, I'm hoping to make a small kitchen window size (ish) curtain.  I found a one-yard remnant piece of a really pretty dark red broadcloth on clearance for a dollar and could NOT pass that up!  I normally do NOT recommend broadcloth for anything in a quilt - it's very thin and often is 35-40% polyester.  Not good.  However, it makes a really cheap curtain that will look nice and homey (the thinness will allow the texture of the fabric to show).  I have also used broadcloth for lining in skirts.  There are some things that cheap fabric is great for - a quilt just isn't one of them.  Since this particular piece of broadcloth is 65% cotton, 35% polyester, I also won't have to worry about shrink.  With 100% cotton, especially loose weave (when you can see the weave really well and/or see through the material and/or stretch it and distort the pattern) cotton will shrink quite a bit.
Another project I have coming up is a dresser makeover.  This one I am so excited about!  I have an old white dresser that will be getting a total refurb very soon and I can't wait to do it!  I am getting an upholstery staple gun (light duty) and some staples this weekend at Hancock Fabrics where they will be 40% off!  I will also be picking up a little bit of cotton (Hancock's "Absolutely Cotton" line is going 50% off!) to put towards a baby quilt I'm making for my niece that's due this Spring (can't wait to meet her!).  I already have the front piece (a cheater quilt top that already has the look of patchwork), the back (I picked flannel, nice and warm), and the buttons to tack the quilt with.  As soon as I tackle that, it'll be on here.
To the right is my 8 month old kitten Jonah.  He really thinks he's helping.  He's not.  He loved the strips in this quilt and every time I got one off the table and took it to my ironing board he tried to attack.  He's pretty fun though.  He has an endless desire to play fetch or 'go get it', and he's very good at it!
Happy Sewing (:

Tuesday, January 17, 2012

Orange and Gray

Okay, I started working on this orange and gray quilt last fall.  I didn't go to the store and pick out all my fabrics at once - that can be a faulty strategy, especially for a beginner.  When you force yourself to pick everything out at one time you might miss a fabric that will be out next week or a good sale price for the material.  However, if you're not very picky or not worried about the cost, picking out everything can be kind of fun.  Okay, back to the quilt.  I collected some fat quarters (pre-cut pieces of material, 18"x21", equal to an 1/8 yard of material) and a few remnant pieces (fabrics that are bolt leftovers or have holes or damage and get marked down really cheap) and I bought a few pieces off the bolt.  I washed all my materials as you always should with 100% cotton. 
Side note:  I NEVER use material I cannot throw in the washing machine.  I have been given yards and yards of fabric and bought remnants that I had no care instructions for and the first thing I did was wash it in cold water and dry it on regular heat.  When I get the material free or cheap, I really haven't lost much if it doesn't survive.  However, if I sit there and spend 3 days making a dress I love and throw it in the wash and lose it - I've really lost something.chose a brick wall pattern (the fabrics are cut in strips and offset each other so the effect is like a brick wall, staggered elongated pieces) and got to cutting.  I cut 2.5"x9" strips till I got tired of it, and sewed them one to the other till I had a really long chain.
Okay, so I got all my cottons washed, then I ironed them, to the left is my iron and my absolute favorite, can't live without it, Mary Ellen's Best Press Spray Starch, Lavender Fields Scent.  She also has a Clean Linen and an unscented one.  It's a little more expensive than most, almost $7 a bottle.  The refills are $12 and fill a smaller bottle almost 3 times full.  Usually you can find it on sale though.  Also, if you're around a Hancock Fabrics they run coupons you can use to get it 40% off.  If you don't want to use it for everything, at least keep a bottle around for blacks, as this is truly a non-flaking starch (and it doesn't screw up your iron!).
After I got my fabric ready, I
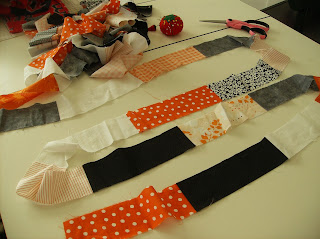
Here's a picture of the chain and a couple more of my gadgets.  At the top left are my trusty pin cushion and my favorite scissors.  They are the Singer Professional scissors, very sharp and very lightweight.  Titanium scissors are really popular right now but they are very heavy and wear my hand out quickly.  Another thing to pay attention to with scissors is the price. I got my pink scissors on a 50% sale and they were only about $7.  Some scissors retail for about $30-$40 dollars and they are very nice, but the most important thing is how they feel in your hand and how they cut.

                                   
Some more tools (I know I'm really laying it on thick today).  This is a 18"x24" mat and a 6"x24" ruler and my rotary cutter.  These making cutting strips and squares and getting straight edges a lot easier.  They can get expensive but they are so helpful and will save you hours of marking and measuring and headache.
All the piecing to get the chain I actually completed several months ago and just today I picked it up again.  I wasn't sure how big this quilt was going to be, but I had a stray piece of white cotton that I decided to use for the back.  I measured it at 39"x45" and I knew I wanted my chain to run horizantally on the 39" width so I started measuring and cutting 39" long strips out of my chain.  I did not use my cutter and ruler for that, just my mat and scissors.  I know I will have to square up and straighten all my edges when I get done with the quilt so it's easier to just measure the 24" length of the ruler then measure to the 15" line and snip it.

After I finished I laid them out on top of the white cotton and began arranging them in a pleasing fashion, trying to avoid big chunks of whites, oranges or grays.  I played it with it for a while and came up with this:


Today I sewed the first five rows together:
As you can see in both pictures, the color pattern is not perfect - I have some really friendly oranges and grays.  I really love the fabrics and colors in this quilt but I still haven't decided what to do with it.  When I finish the piecing it will be about the size of a baby quilt.  I've thought about several things.  Mostly I've thought about making it bigger. (:  Just so you know - I'm not aiming for perfection here, just completion.  If you put the pressure on to make it perfect, you'll never be satisfied.
I would love to sew and chat some more but today other things are calling.  Tonight I'm trying a new recipe in my slow cooker, a Chicken Chili recipe.  My husband and I very rarely eat meat and I'm only putting in about half of what the recipe actually calls for so I'm hoping it turns out all right.
Till next time, happy sewing!

Friday, January 13, 2012

This blog is all about my life as a wanna be fabric guru.  I sew, quilt and make fabric work for me and my family.  I am happy to do this because making my own curtains, clothes or bedding often saves my family some money and it seems to be in line with what God had in mind for me.  I do delight in working with my hands and hope you learn things here that will brighten your day.
If you'd like to know a little bit about me, check out my profile and feel free to comment if you want to know more about any of the projects or ideas I post on here.  One of my very favorite things to do is help people do what I love doing!
I may post every now and then a new recipe or a new book, but more than anything I hope this site gives you ideas, inspiration and helpful know how to get your project done and done well.
Happy sewing (: